CloudCIX Terraform Guide
This guide will walk you through the steps required to set up and use Terraform with CloudCIX.
Step 1: Choose Your Region
Note
Contact your region provider to obtain a region_id.
For this example we’ll use test_region with an ID of 123456.
Region Name |
Region ID |
|---|---|
test_region |
123456 |
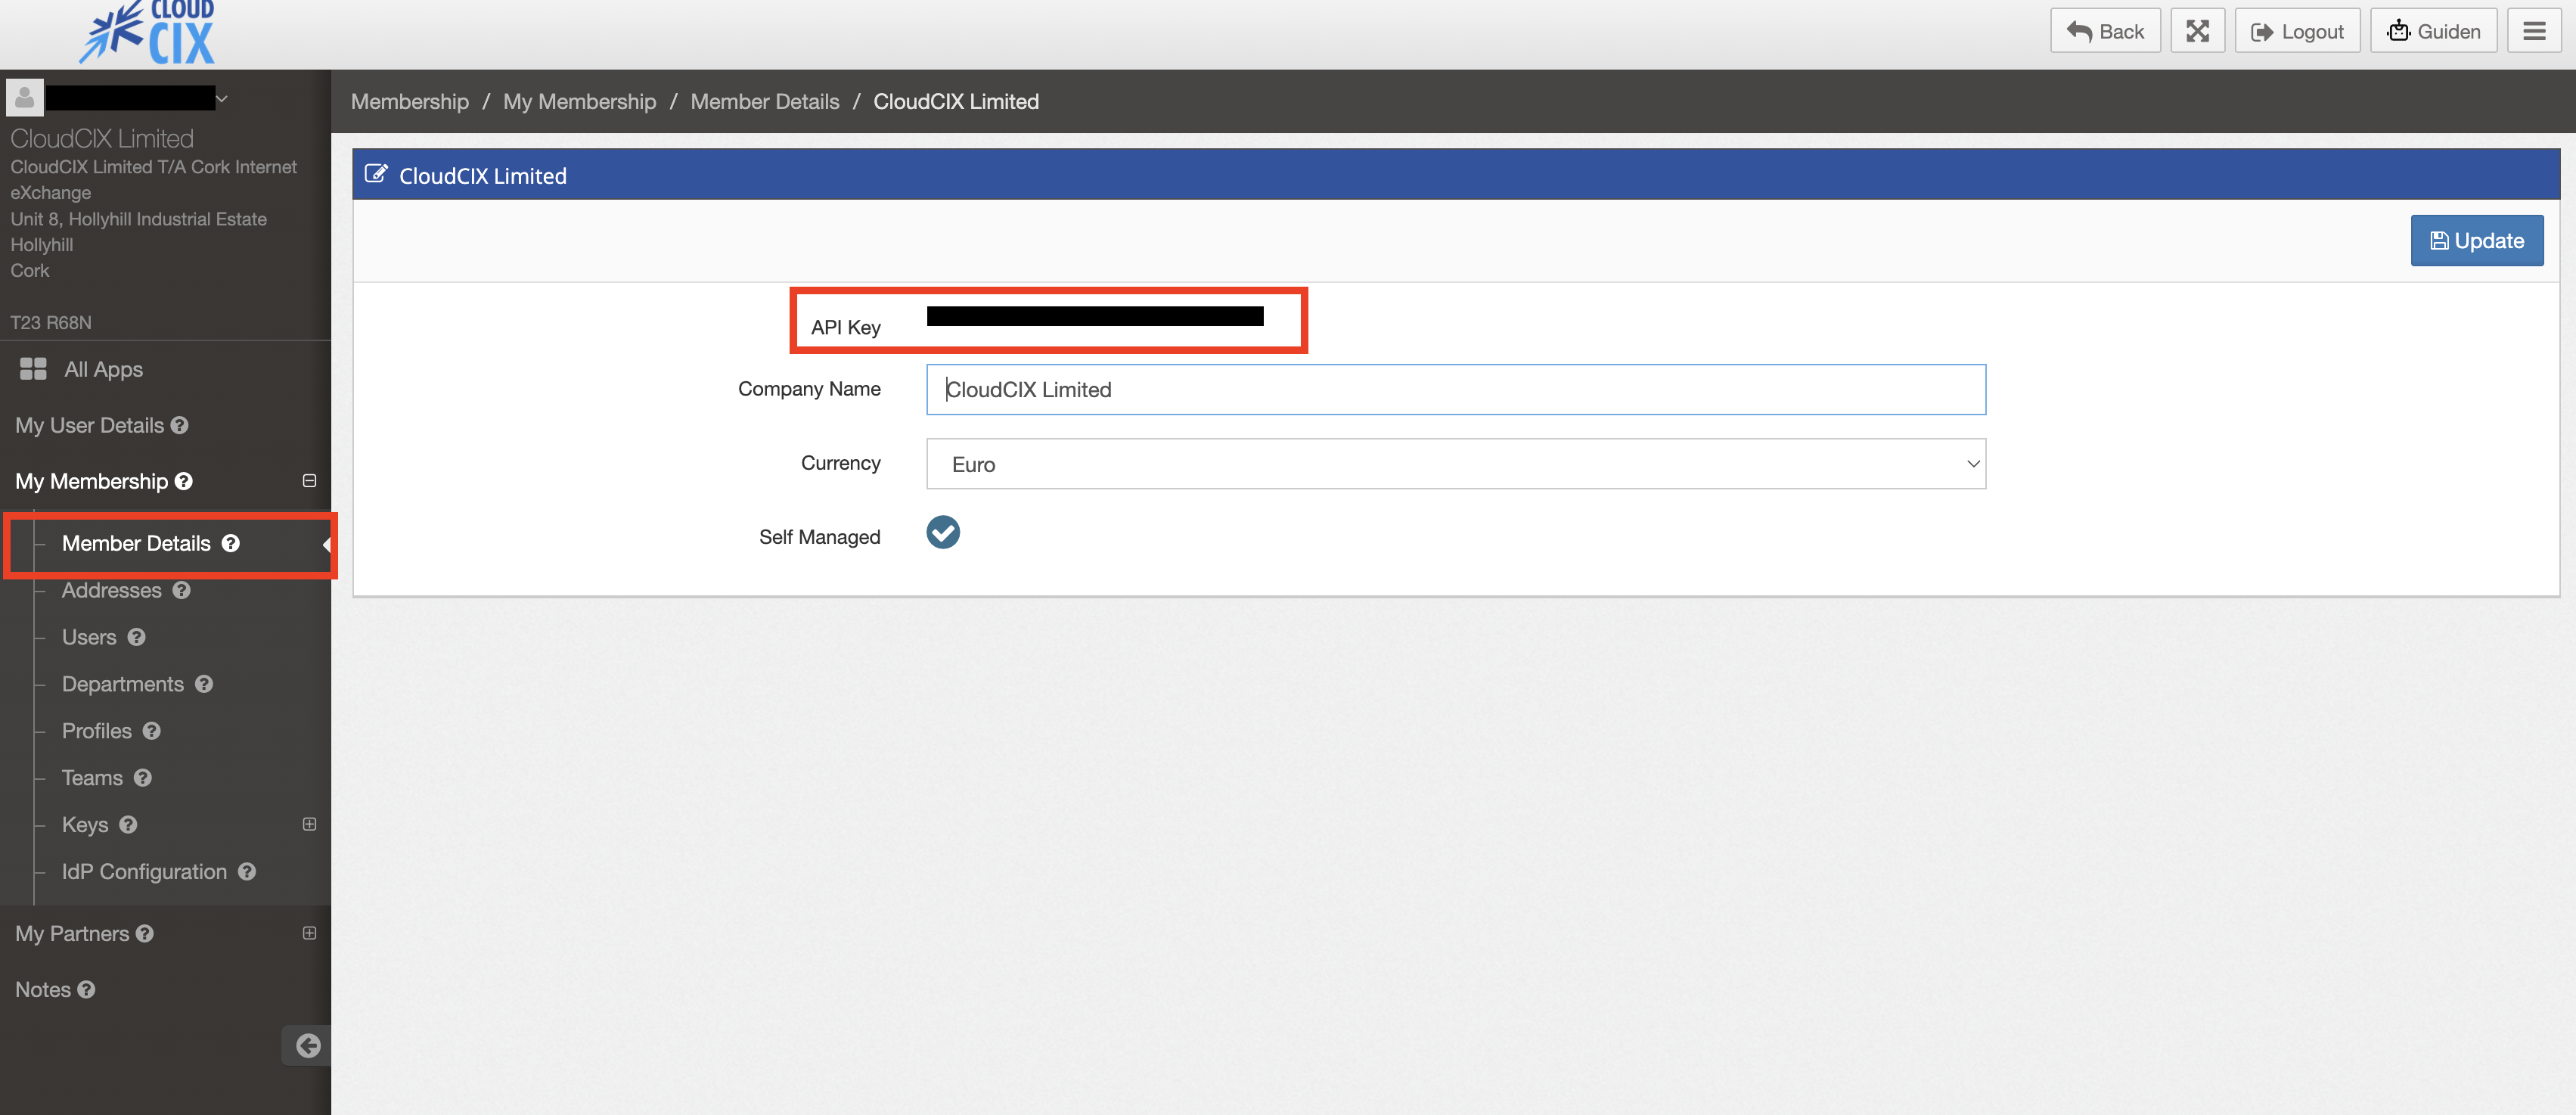
Step 2: Obtain Your API Keys
Go to https://saas.cloudcix.com.
Log in with your CloudCIX credentials.
Open Membership.
Go to My Membership → Member Details.
Locate your API Key.
Step 3: Install Terraform
Follow the instructions on the official Terraform website to install Terraform on your system:
Step 4: Clone and configure the CloudCIX Terraform Template
Clone the CloudCIX Terraform template repository from GitHub:
https://github.com/CloudCIX/Terraform-Template
git clone https://github.com/CloudCIX/Terraform-Template.git
cd Terraform-Template/cloudcix-terraform
Configure Credentials
Copy the example variables file and fill in your CloudCIX credentials:
cp terraform.tfvars.example terraform.tfvars
Edit terraform.tfvars with your credentials and region ID (from Steps 1 and 2):
cloudcix_api_url  = "https://api.cloudcix.com/"
cloudcix_username = "user@example.com"
cloudcix_password = "your-password"
cloudcix_api_key  = "your-api-key"
region_id         = 123456
Note
Credentials can also be supplied via environment variables
(CLOUDCIX_API_URL, CLOUDCIX_API_USERNAME, CLOUDCIX_API_PASSWORD,
CLOUDCIX_API_KEY, CLOUDCIX_REGION_ID) instead of terraform.tfvars.
Initialize Terraform
terraform init
This downloads the CloudCIX provider (version ~> 0.22.1) from the Terraform Registry.
Configure Infrastructure Variables
Edit the remaining variables in terraform.tfvars to describe the infrastructure you want:
project_name  = "my-project"

# Network
cidr          = "10.0.0.0/24"
network_name  = "My Network"
nameservers   = "9.9.9.9, 8.8.8.8, 1.1.1.1"

# Instance
instance_name   = "my-instance"
instance_type   = "virtual-machine"  # or "container"
hypervisor_type = "lxd"

# SSH Key
# Option A: provide your own public key
ssh_key_name   = "my-key"
ssh_public_key = "ssh-ed25519 AAAAC3NzaC1lZDI1NTE5AAAA..."
# Option B: omit ssh_public_key — API auto-generates an Ed25519 keypair.
#           Retrieve the private key after apply with:
#             terraform output -raw ssh_private_key

# Cloud-init — the SSH key above is injected automatically; password is optional.
# Generate a hashed password with: openssl passwd -6 yourpassword
userdata = <<-EOF
#cloud-config
users:
  - name: administrator
    groups: sudo
    shell: /bin/bash
    lock_passwd: false
    passwd: <YOUR_HASHED_PASSWORD>
chpasswd:
  expire: false
ssh_pwauth: true
EOF

# Instance Specifications
instance_specs = {
  cpu = {
    sku      = "vCPU_001"
    quantity = 2
  }
  ram = {
    sku      = "RAM_001"
    quantity = 4
  }
  storage = {
    sku      = "SSD_001"
    quantity = 32
  }
  image = {
    sku      = "UBUNTU2404"  # check available images with your CloudCIX provider
    quantity = 1
  }
}

# Firewall Rules — restrict SSH to your IP; HTTP/HTTPS open to all
firewall_rules = [
  "in tcp 22 22 <YOUR_IP>/32 10.0.0.0/24",
  "in tcp 80 80 0.0.0.0/0 10.0.0.0/24",
  "in tcp 443 443 0.0.0.0/0 10.0.0.0/24",
]

# Storage Volume (optional — see "Storage Volume" section below)
# storage_volume_name = "my-volume"
# storage_volume_type = "cephfs"
# storage_volume_specs = { sku = "CEPH_002", quantity = 20 }
# storage_volume_mount_path = "/mnt/data"
Resources Created
This configuration provisions the following CloudCIX resources:
1. Project (cloudcix_project)
Creates a CloudCIX project in the specified region. Accepts an optional project_note for a
human-readable description.
2. Network Router (cloudcix_network_router)
Creates a virtual router with:
NAT enabled
Custom IPv4 network (CIDR)
Network isolation
3. SSH Key (cloudcix_compute_ssh_key)
Registers an SSH public key with CloudCIX. The key is automatically injected into the instance
during provisioning — no need to add it manually to ssh_authorized_keys in your cloud-init.
Two flows are supported:
Bring your own key (BYOK): set
ssh_public_keyto the contents of your public key file (e.g.~/.ssh/id_ed25519.pub).Auto-generate: omit
ssh_public_key(or set it tonull). The API generates an Ed25519 keypair and returns the private key once in the Terraform output. Retrieve it with:terraform output -raw ssh_private_key
Warning
Save the private key immediately — it is never stored by the API and cannot be retrieved again.
4. Compute Instance (cloudcix_compute_instance)
Creates a virtual machine with:
Custom CPU, RAM, and storage specifications
Network interface with NAT
Public and private IP addresses
Cloud-init userdata support
SSH key injected automatically via
ssh_key_names
5. Firewall (cloudcix_network_firewall)
Controls inbound/outbound traffic to your project’s networks.
The template uses a compact string syntax for rules:
"{direction} {protocol} {port_start} {port_end} {source_cidr} {destination_cidr}"
direction:
in(inbound) orout(outbound)protocol:
tcp,udp,icmp, oranyport_start / port_end: Port range (0–65535). Use the same value for a single port.
source_cidr: Source IP or CIDR (e.g.
0.0.0.0/0for anywhere, or1.2.3.4/32for one host)destination_cidr: Destination IP or CIDR (typically your private network CIDR)
Example rules:
firewall_rules = [
  # SSH restricted to your IP (find it at https://ifconfig.me)
  "in tcp 22 22 1.2.3.4/32 10.0.0.0/24",

  # HTTP and HTTPS open to the world
  "in tcp 80 80 0.0.0.0/0 10.0.0.0/24",
  "in tcp 443 443 0.0.0.0/0 10.0.0.0/24",

  # Custom port range
  "in tcp 8000 8100 0.0.0.0/0 10.0.0.0/24",
]
Warning
When updating firewall rules, you must include all rules you want to keep. The update replaces the entire rule list — any omitted rule is permanently deleted.
Note
Never open SSH (port 22) to 0.0.0.0/0 in production.
Always restrict it to a known trusted IP.
6. Storage Volume (cloudcix_storage_volume) — optional
Creates a Ceph network-attached storage volume and attaches it to the compute instance. Two types are supported:
cephfs: Shared file system, mounted at the path specified bystorage_volume_mount_pathcephrbd: Block storage device
To enable storage, uncomment the storage variables in terraform.tfvars and the resource
block in storage.tf.
Deploy & Destroy Infrastructure
# Preview changes
terraform plan

# Apply (will prompt for confirmation)
terraform apply

# Apply without confirmation prompt
terraform apply -auto-approve

# Destroy all resources
terraform destroy
View Outputs
terraform output
Example output:
instance_id    = "12345"
private_ip     = "10.0.0.10"
private_subnet = "10.0.0.0/24"
project_id     = "67890"
public_ip      = "203.0.113.42"
ssh_key_id     = "99"
To retrieve an auto-generated SSH private key:
terraform output -raw ssh_private_key