Mount Linux 2nd Drive
Whenever you build a Linux VM with two or more drives, the first drive contains the operating system (OS) and is automatically attached to the VM. You need to manually “attach” the second and subsequent drives after the VM is built in order to use it/them. There are multiple ways of doing this, the tutorial below demonstrates how to create and mount a logical volume using a logical volume manager (LVM). In this example, there is a 15GB drive on which the OS is installed (primary drive) and a second 25GB drive for extra storage.
Step 1
Log into VM using the credentials that were emailed when the VM was built and run sudo apt update and sudo apt upgrade.
Step 2
Run command below to view the basic details about all available drives in the VM.
sudo lsblk
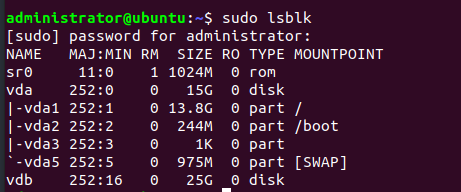
The secondary drive in the screenshot above is /dev/vdb.
Note that your secondary drive may be named something different.
Step 3
Install Logical Volume Manager library
sudo apt-get install lvm2
Step 4
Create Physical Volumes out of additional drives:
sudo pvcreate /dev/vdb

If there is warning reported that the physical volume cannot be initialised, this means /dev/vdb has some existing metadata or data that prevents it from being initialized as a physical volume. This occurs if the drive was previously mounted on a VM.

To get the name of the Volume:
sudo vgscan

To activate the volume group so that its logical volumes can be accessed:
sudo vgchange -ay MyVolGroup

This makes the logical volumes available for mounting. Please continue to Step 8
Step 5
Create Volume Group named “MyVolGroup” out of all additional drives:
sudo vgcreate MyVolGroup /dev/vdb

Step 6
Create Logical Volume “MyLv” with all the available pace of the Volume Group “MyVolGroup”
sudo lvcreate -l 100%FREE -n MyLv MyVolGroup

Step 7
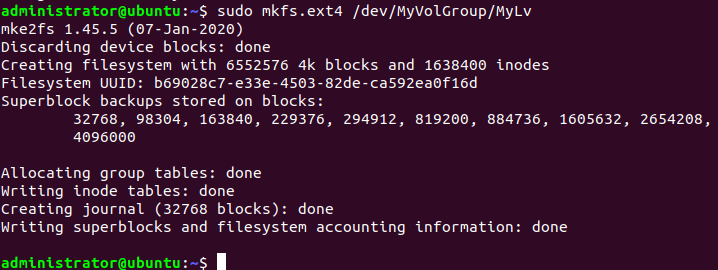
Format LV “MyLv” with the ext4 file system
sudo mkfs.ext4 /dev/MyVolGroup/MyLv
Step 8
Create a mount point.
sudo mkdir /mnt/data
Step 9
Mount the logical volume to the mount point
sudo mount /dev/mapper/MyVolGroup-MyLv /mnt/data/
Step 10
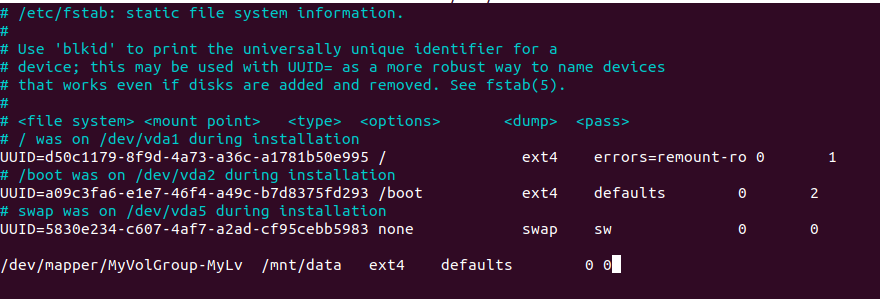
Modify /etc/fstab so that the LV is mounted during the boot
sudo nano /etc/fstab
Append the following to the end of the fstab file
/dev/mapper/MyVolGroup-MyLv /mnt/data ext4 defaults 0 0
Step 11
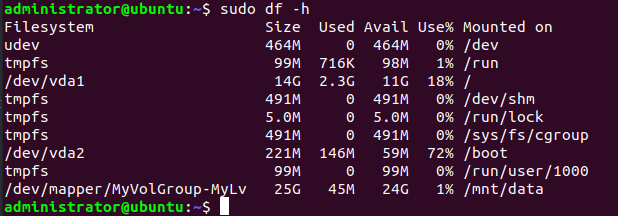
Logical Volume is mounted on /mnt/data
sudo df -h
Step 12
Reboot VM
sudo reboot
Mounting Secondary Block Device on LXD VM
If you have attached a secondary block device to an LXD VM and want to mount it directly without using LVM, follow these steps:
Step 1: Verify the Block Device
Run lsblk to list all available block devices:
lsblk
Example output:
NAME    MAJ:MIN RM  SIZE RO TYPE MOUNTPOINTS
sda       8:0    0 46.6G  0 disk
├─sda1    8:1    0 45.6G  0 part /
├─sda14   8:14   0    4M  0 part
├─sda15   8:15   0  106M  0 part /boot/efi
└─sda16 259:0    0  913M  0 part /boot
sdb       8:32   0   10G  0 disk
In this example, sdb is the secondary block storage device we’ve attached to our VM.
Step 2: Create Filesystem
Create an ext4 filesystem on the block device:
sudo mkfs.ext4 /dev/sdb
Step 3: Create Mount Directory
Create a directory in /mnt/ to mount the block storage:
sudo mkdir /mnt/block-storage
Step 4: Mount the Block Storage
Mount the block device to the directory:
sudo mount /dev/sdb /mnt/block-storage
Step 5: Verify Mount
Check that the device is mounted:
df -h | grep sdb
Step 6: Make Mount Persistent (Optional)
To ensure the block device is automatically mounted after reboot, add an entry to /etc/fstab:
sudo nano /etc/fstab
Add the following line at the end:
/dev/sdb /mnt/block-storage ext4 defaults 0 0
Save and exit. The block storage will now be mounted automatically on boot.