Podnet
Introduction
This chapter describes the theory of operation of PodNet. PodNet is the CloudCIX networking platform based on Linux networking and it runs on a bare metal server. PodNet’s features include…
Private IPV4 (RFC1918) addresses and NAT
Public (floating) IPv4 addresses
Site to Site IPSec VPN Tunnels
Dynamic VPN Tunnels (based on WireGuard.)
Stateful Firewall Rules
IPv6 IPs networking
Allow network sharing between Projects in one Region
Allow network sharing between Projects in two Regions
Allow permanent assignment of IPv4 and IPv6 public addresses to Members
Allow Members ‘bring your own IPs’ to a Region.
Unlimited number of RoboSOC Blocklist IPs
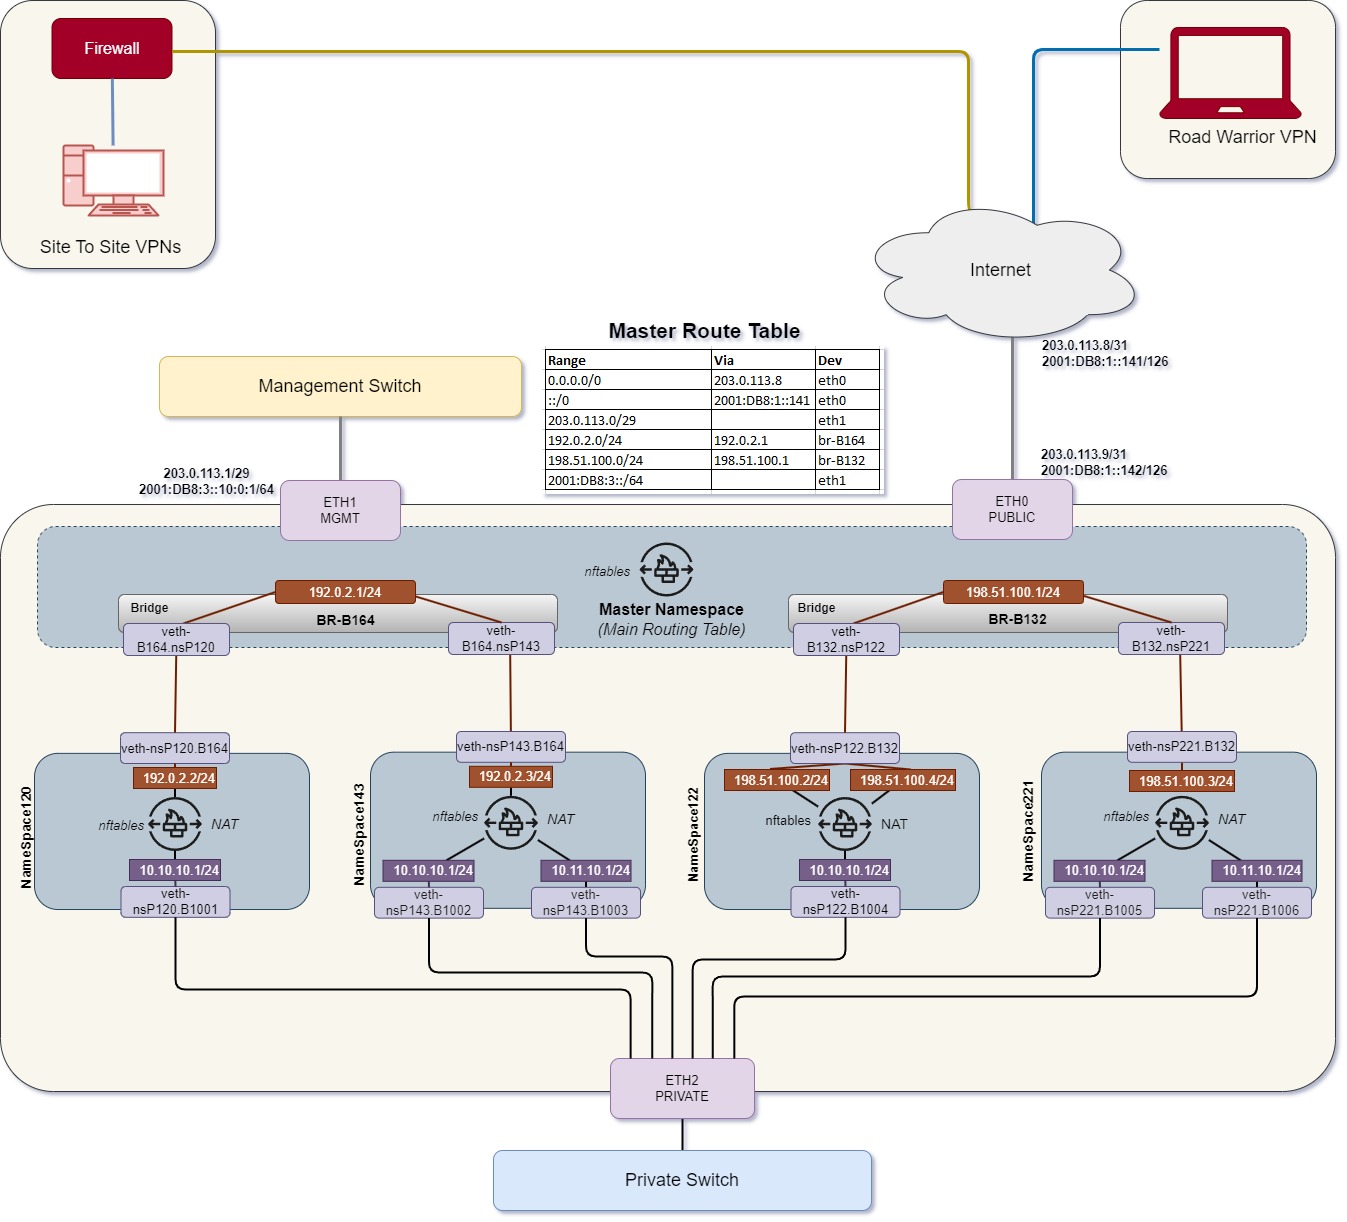
Podnet is the source of Management and Private networks for a Pod. It also routes to Public network for both Management and Private networks. Podnet implements its functionality via Linux namespaces. Linux namespaces allow the implementation of an IP technology called virtual routing and forwarding (VRF). This VRF capability allows the creation of separate CloudCIX projects where each project is fully isolated from every other project.
Podnet
- A Virtual Router is a group of private networks/vlans, firewall rules, nats and vpns. When a Virtual Router is requested, Robot prepares a template with group of Linux IP commands, includes:
Namespace
Public network (Floating subnet) connection
Vlan bridges
Connections to vlan bridges
Firewall outbound, inbound rules, snat and dnat rules applied through the nftables file.
Vpn tunnels
For an update of a Virtual router, Robot scrubs entire Virtual router first and then rebuilds entire Virtual router namespace and related
Every Virtual router gets a Public IPaddress(vrf_ip) from the pool of Floating subnets allocated to the Region. Robot adds the Floating subnet bridge on the Podnet box if not already present.
Setup Requirements
PodNet is setup using CloudCIX’s Pod Installation method. Minimum requirements are as follows..
IP addressing PreRequisites
1 IPv6 /126 or larger Link Subnet
1 IPv6 /48 Subnet for Management and Project /64s
1 IPv4 /29 or larger Link Subnet
1 IPv4 /29 Subnet Primary Management Subnet
1 or more Floating/Public Subnets for Region flavors
CloudCIX’s Podnet Network Diagram
Global Network
This is the primary network configuration also Global configuration on a Pod that gives external connectivity (Public network), Management network. This is done in Podnet installation step simply by applying netplan yaml config with all interfaces definitions and routes. This step also applies global firewall rules (nftables).
The initial configuration, also called Main namespace, is applied during Podnet box setup using CloudCIX ISO.
Configuration includes:
Interface configuration using the netplan.yaml file.
Applying Firewall rules using the nftables configuration file.
Management Network
Interface configuration
{{ router_management_interface }}:
    dhcp4: false
    accept-ra: no
    addresses:
        - {{ ipv4_management }}
        - {{ ipv6_management }}
    routes:
        - to: {{ docker_mgmt_subnet }}
          via: {{ ip6 }}{% if cop %}4000:1{% else %}6000:1{% endif %}
DHCP and Router Advertisement are disabled for Mangement interface.
Assign the gateway address of the Primary Management subnet and the gateway of the IPv6 Subnet of the POD to the management interface.
Configure static route for IPv6 docker subnet to Pod appliance Management IP address(PMSv6)
Public Network
Interface configuration
{{ router_public_interface }}:
    dhcp4: false
    accept-ra: no
    addresses:
        - {{ ipv4_link_cpe }}/{{ ipv4_link_subnet_mask }}
        - {{ ipv6_link_cpe }}/{{ ipv6_link_subnet_mask }}
    routes:
        - to: default
          via: {{ ipv4_link_pe }}
        - to: ::/0
          via: {{ ipv6_link_pe }}
    nameservers:
        addresses: [{{ primary_dns }}, {{ secondary_dns }}]
DHCP and Router Advertisement are disabled for the Public interface.
Assign the IPv4 link subnet CPE and IPv6 link subnet CPE along with subnet masks.
Configure static routes in the Public network for defaults to link PEs.
Configure Primary and Secondary DNSs.
- Project assignment floating subnets are configured as bridges in separate yaml files and are created by Robot.
These bridges link Project namespaces to WAN.
Every Project gets one floating IP from this subnet for Outbound traffic.
Firewall Configuration
Ping(ICMP, ICMP6) are allowed for Inbound and Forwarding traffic.
DNS and IKE services are enabled
Inbound SSH access from PAT’s application to Podnet box allowed for adoption and provisioning services.
All outbound requests from the Public interface to PE are allowed.
Private Network (Region blends only)
Interface configuration
{{ router_private_interface }}:
    dhcp4: false
    accept-ra: no
DHCP and Router Advertisement are disabled for the Private interfaces.
Router’s private interface to receive and forward single-tag frames with 802.1Q VLAN tags.
- Project namespace’s networks, also known as VLANs, are connected to Private interface via VLAN tagged bridges.
Robot creates these connections in the Project namespace build task.
Firewall configuration
Inbound and outbound for private networks are all allowed on Main namespace but are controlled in Project namespaces.
OOB Network
Interface configuration
{{ router_oob_interface }}:
    accept-ra: no
    addresses:
        - 10.{{ pod_number }}.{{ rack_number }}.{{ unit_number }}/16
    routes:
        - to: 10.0.0.0/8
          via: 10.0.0.1
Router Advertisement is disabled for the OOB interfaces.
Configure the router’s private logical interface’s description to “OOB” and assign the gateway address 10.<pod_number>.0.254/16 to the interface.
Configure a static route “10.0.0.0/8 next-hop 10.0.0.1(PAT’s OOB gateway)”. All the Pods OOB gateway networks are connected to PAT’s OOB gateway network over Site-To-Site VPN tunnels.
Services Enabled
- icmp
Allow ping requests from remote systems for both IPv4 and IPv6 CPEs over Public interface.
- ssh
Allow SSH limited access from PAT application, PAT’s jumphost and Robot containers.
This is required to allow the PAT engineers to connect and remotely monitor and control the Podnet box.
Robot uses SSH to access Podnet to create, update and delete Project’s namespaces.
- ike
Allow Projects VPN tunnels to terminate on the Public Interface.
- dns
Allow dns look up for all the requests from and through the Podnet box.
- user defined
All User defined services (combination of transport protocol and port/s) are enabled as per user interest provied in Projects creation.
Users
Configure “administrator” super user with a password. The intention of this password is to be used for forensic analysis of a Podnet box.
If the POD has a region flavour, configure super user “robot” with the public key of the POD Appliance.
Traffic Forwarding
IPv4 route forwarding is enabled in system ctl settings. net.ipv4.ip_forward=1
Project Networks
A PodNet’s Virtual Router is an isolated network environment uses linux namespace, floating bridge connections, private vlan bridges and connections and nftables.
There are three types of networks a project can connect to.
Private networks contain a gateway and are unique per project. They connect VMs in one project together.
Intra region networks are unique per region per member and are intended to connect different projects within a region.
Inter region networks are unique per member are are intended to connect to connect projects within and across regions.
Project Configuration
A Project is a Namespace on Podnet, it is identified as “P<Project_id>”
Loopback interface is enabled for a Project namespace.
A virtual connection between Floating Subnet bridge and Project namespace is made.
Floating bridge end identified as B<IPv4_Floating_Subnet_id>.P<Project_id>
Project namespace end identified as P<Project_id>.B<IPv4_Floating_Subnet_id>
Floating IP and subnet mask are defined on this virtual interface.
All the floating traffic is sent though a default route to Floating subnets gateway.
All NAT ips for VMs are defined on this virtual interface.
Virtual connections between Private (RFC1918) networks and Vlan bridges of Private interface.
Project namespace end identified as P<Project_id>.B<vlan>
Vlan bridge end identified as B<vlan>.P<Project_id>
Each private network gateway is defined on each virtual interface.
Gateway addresses are defined on these virtual interfaces.
IPv4 route forwarding is enabled within Project’s namespace systemctl services.
Project Firewall rules are applied within Project’s namespace through a nftables config file
Project VPN configs are applied through a Stongswan-swanctl config files on Main namespace.
Each VPN gets an XFRM logical interface defined on Public interface(main namespace) and is linked to concerned Project.
XFRM interface’s policy is disabled in systemctl settings net.ipv4.conf.xfrm<tunnel_number>.disable_policy=1
Remote VPN subnets are routed over this XFRM.tunnel_number interface.
Firewall Configuration
Podnet uses NFTables of linux networking for Firewall rules and Routing.
Following general chains used to reuse in the later sections of nftables.
Global chain: To accept already allowed traffic
chain global {
    ct state established,related accept
}
Ping chain: Complete ping related chain
chain icmp_allow {
    icmp type { echo-reply, destination-unreachable, echo-request, time-exceeded } accept
    icmpv6 type { echo-request, mld-listener-query, nd-router-solicit, nd-router-advert, nd-neighbor-solicit, nd-neighbor-advert } accept
}
NFTables are distributed into following 5 sections:
- Pre-routing:
1:1 destination NATs defined here
All other traffic is allowed
- Inbound:
Namespace access rules
Only Ping, IKE and DNS are allowed
All other traffic is blocked
- Outbound:
Everything outbound traffic is allowed
- Forwarding:
DNS is allowed
All the user firewall rules are applied here
All other traffic is blocked
- Post-routing:
Source NATs are defined here.
All the private networks are source NATed to the Floating Subnet IP defined on the Project Namespace.
VPN Configuration
All the Project’s VPNs are in one dedicated config file placed at /etc/swanctl/conf.d/ . Swanctl VPN config called as connection distributed into IKE and IPSec (children) security associations.
IKE SA consists, that are used by CloudCIX:
version : 1 or 2
aggressive: yes or no : always yes if version = 1
proposals: IKE authentication method-encryption-dhgroups
reauth_time: lifetime of IKE phase, re-authentication time for Version 1
over_time: lifetime of IKE phase, re-authentication time for Version 2
local_addrs: Region Podnet router’s IPv4 CPE
remote_addrs: User provided Remote IPaddress
if_id_in: logical number or tunnel number of XRFM interface of the VPN
if_id_out: logical number or tunnel number of XRFM interface of the VPN
local-<vpn_id>: local authentication section
auth : Pre-shared key (psk)
id : FQDN : <vpn_id>local.<pod_name>.<organisation_url>
remote-<vpn_id>: remote authentication section
auth : Pre-shared key (psk)
id : FQDN : <vpn_id>remote.<pod_name>.<organisation_url>
IPSec SA (Children SAs of IKE SAs) consists, that are used by CloudCIX:
rekey_time: lifetime of IPSec phase, re-keying time for Version 1
life_time: lifetime of IPSec phase, re-keying time for Version 2
local_ts: Projects private networks are local traffic selectors
Traffic selectors must be enabled if two or more local networks are routed to VPN tunnel.
remote_ts: Remote private networks are remote traffic selectors
Traffic selectors must be enabled if two or more remote networks are routed to VPN tunnel.
esp_proposals: IPsec authentication_method-encryption-dhgroups
if_id_in: logical number or tunnel number of XRFM interface of the VPN
if_id_out: logical number or tunnel number of XRFM interface of the VPN
start_action: Tunnel Establishment method.
immediately (start) : Peering at the time of Project build.
on-traffic (trap) : Peering on traffic from Private networks across VPN tunnel.
Swanctl credentials config called secrets section contains:
ike-<vpn_id>: every VPN connection section gets one
secret: Pre-shared key provided by the user
id-local-<vpn_id>: IKE SA’s local identifier.
id-remote-<vpn_id>: IKE SA’s remote identifier.
StrongSwan VPN Requirements
IKE Authencation
SHA1 = ‘sha1’
SHA256 = ‘sha256’
SHA384 = ‘sha384’
IKE DH Groups values
DH_GROUP_1 = ‘modp768’
DH_GROUP_2 = ‘modp1024’
DH_GROUP_5 = ‘modp1536’
DH_GROUP_19 = ‘ecp256’
DH_GROUP_20 = ‘ecp384’
DH_GROUP_24 = ‘modp2048s256’
IPSec Authentication values
HMAC_SHA1 = ‘sha1’
HMAC_SHA256 = ‘sha256’
HMAC_SHA384 = ‘sha384’
IPsec Encryption values
ES128 = ‘aes128’
AES192 = ‘aes192’
AES256 = ‘aes256’
AES128GCM = ‘aes128gcm64’
AES192GCM = ‘aes192gcm64’
AES256GCM = ‘aes256gcm64’
IPSec PFS Group values
PFS_GROUP_1 = ‘modp768’
PFS_GROUP_2 = ‘modp1024’
PFS_GROUP_5 = ‘modp1536’
PFS_GROUP_14 = ‘modp2048’
PFS_GROUP_19 = ‘ecp256’
PFS_GROUP_20 = ‘ecp384’
PFS_GROUP_24 = ‘modp2048s256’
Note
For IKEv1, only Aggressive mode is supported.
On the CloudCIX side of the VPN we ensure that the IKE local identifier is unique as the FQDN includes the primary key id of the VPN Tunnel. If there is multiple VPNs on the remote side to CloudCIX terminating on the same IP or FQDN, then the remote side would also need to ensure that their IKE local identifiers are unique. This will only need to be monitored if not using the CloudCIX suggested IKE remote identifier as the IKE local identifier on the remote side of the VPN.
IKE remote identifer: must always be unique across same Remote VPN terminal IP address.
IPSec HMAC authentications cannot be used along with IPSec GCM Encryption
Reserving address Space for inter project networks
Intra region and inter region networks utilise RFC1918 IPv4 address space.
An administrator for your CloudCIX membership must reserve IPv4 address space for intra and inter region shared address space.
Shared address space for intra region networks cannot be in use by any project in that region by that member, before use.
After intra region address space is reserved, it cannot be used in any project in that region by that member.
Shared address space for inter region networks cannot be in use by any project in any region by that member, before use.
After inter region address space is reserved, it cannot be used in any project in any region by that member.